3D Geometry Repair
10 Ways to Optimize 3D Print Results with TransMagic
3D printing and additive manufacturing processes are increasingly being used in to achieve quick turnaround on prototypes and to generate complex models cost effectively in low volume.
Preparation of the geometry is the key to getting optimum results with 3D printing. The geometry conversion and repair tools in TransMagic can save hours of frustration, lost time and wasted materials. Here are 10 ways TransMagic can help you:
1. Watertight Models: Designs used for 3D printing need to be watertight solid models.

3D printers pre-process models into very thin horizontal slices of the part. Watertight geometry is necessary for the preprocessing step to avoid errors. The geometry repair tools in TransMagic SuperView, Pro and Expert, can make fast work of correcting geometry issues by stitching loose surfaces together to create a watertight solid. Repairing a 3D model is best done prior to converting the file to the STL format used by 3D printers. For models with more extreme geometry problems and errors, TransMagic’s MagicHeal has the power to close gaps, fix self-intersections and replace missing faces with minimal effort (see figure 1).
2. STL Mesh: Successful 3D printing or additive manufacturing demands a high-quality STL mesh.
3D printing has many different uses, such as checking fit, function, ergonomics, esthetics, etc. Quality constraints can vary between a prototype and a finished part. The STL Mesh controls many aspects of the part quality. A fine mesh will help avoid ‘flat’ faces on curved surfaces to optimize aesthetics and functional designs. All TransMagic products allow the user to optimize STL faceting for a wide range of needs, enabling nearly infinite mesh control and density. Angle control and Chordal deviation controls allow the designer or engineer to determine exactly how closely the STL mesh will follow the original CAD model geometry. Note the optimization control you have and the range of options available.
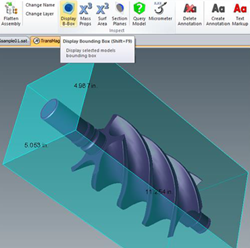
3. It is important to know if the part will fit within the build envelope.
Figure 2: TransMagic’s Bounding Box – minimum xyz envelope of your part.
3D printing has many different uses, such as checking fit, function, ergonomics, esthetics, etc. All 3D printers have a finite build envelope which the part must fit into. All TransMagic products offer a one-click Bounding Box tool that instantly builds the minimum size box, in X, Y, and Z dimensions, that will encompass the part. The Bounding Box dimensions show up automatically for easy reference (see figure 2).
4. It is important to know much material will be required for each print.
Whether it is a part or an assembly, it helps to know how much material the geometry will require. Part Volume can be estimated quickly by clicking the X3 button on the menu bar. Other part data included with the volume are center of gravity, mass (based on selected material density) and inertial moments.
5. Separating or isolating parts from an assembly.
Sometimes it may be helpful create discrete STL files of all of the parts in a multi-part assembly. TransMagic offers a feature, called Atomize, which does exactly that. An entire assembly can be broken into individual STL part files, so that each part can be printed separately. With a single setting, TransMagic can make the process happen automatically. TransMagic’s Atomize feature will automatically break the entire assembly into individual part files in any supported format. If you have lots of these assembly files, the MagicBatch add-on will allow you to turn hundreds of full assemblies into separate part files in minutes.
6. Printing 3D working assemblies can require the ability to import and position components.
TransMagic lets you import parts and place them using the new Precise Positioning tool to optimize parts for printing or mating. Parts can be aligned in many ways including the use of planar alignment, concentricity, parallel edges, linear transforms, rotational transforms, 3-point transforms and freeform transforms(see figure 3).
7. Part orientation can be critical in 3D printing.

For example, inserts should be positioned in such a way that the printing process can continue once the insert has been added to the part so that the insert will not get in the way of the printing tip, and living hinges should be built so that they are part of a series of contours connected to the main body of the part. Precise Positioning allows the user to rotate the part into an optimal angular orientation prior to writing the STL file (see figure 4).
8. Part Scaling:
3D printing has many different uses, such as checking fit, function, ergonomics, esthetics, etc. Sometimes the prototype part needs to be smaller or larger than designed. Maybe the full-sized prototype will not fit within the 3D printer’s build size, or it may take longer than desired to test fit, form and function. If you are trying to optimize the overall part height so that it can be produced with near-perfect accuracy in the z-axis. TransMagic products offer Part Scaling to accommodate these needs and scale CAD or polygonal geometry. TransMagic Expert provides advanced features to scale parts non-uniformly.
9. Part Simplification:

10. Unite or subtract geometric shapes: TransMagic can create molds by subtracting one 3D shape from a block and then scaling the new mold to allow for shrinkage factors.
If you want to print a package design for a new product (part or assembly), the product design assembly can first be united into a single part, subtracted from a package block, then scaled to allow for shrinkage or loose fitting. TransMagic can create a perfect negative for the finished assembly packaging. Or you may want to subtract geometry from a thick wall in order to create a sparse or honeycomb fill, which will shave part material, weight, and print time from your design. TransMagic’s Boolean Unite and Subtract functionality allows you to A) unite several parts or an entire assembly into a single part, and B) use parts and blocks as bodies to subtract geometry from other parts.